What is Sage HR?
Sage HR is a cloud-based human resources management solution (HRMS) designed to help organizations manage their HR processes, particularly for small to medium-sized businesses.
In this guide, we’ll explore how to integrate Sage API into your applications, look at common use cases, and offer best practices for troubleshooting API issues. Whether you’re a developer, HR-tech professional, or part of a tech team evaluating Sage, this blog aims to help you leverage the API effectively.
Note - This is an educational article on Sage API. If you’re looking for an easier way to launch integrations with Sage HR, check out Bindbee.
Our Unified API connects you to 50+ HRIS, ATS and Payroll Platforms in minutes. Zero maintenance, no-code Integrations that lets you launch at one-tenth the cost of custom Integrations.
That said, Here’s what we’ll cover in this article:
- A step-by-step Sage API integration guide using Direct API and other key methodologies.
- An overview of the API’s capabilities and key features.
- Best practices and troubleshooting tips for smooth API operations.
Understanding Sage API
What is Sage API?
Sage API allows businesses to access Sage HR’s accounting, payroll, and financial data through RESTful endpoints.
Sage - Key Use Cases
1. Integration with Custom Applications
Use the API to connect custom-built business applications with Sage’s accounting and payroll systems to facilitate data exchange for invoices, transactions, and reports.
2. Data Synchronization Across Platforms
The Sage API allows developers to sync data between Sage and other third-party applications, such as CRMs, ERP systems, and e-commerce platforms, ensuring consistency across various business tools.
3. Building Real-Time Financial Dashboards
Fetch live financial data from Sage’s accounting system to build custom dashboards, providing businesses with real-time insights into cash flow, profits, and financial forecasts.
4. Inventory and Order Management
Developers can use the Sage API to integrate inventory tracking and order management with Sage, automating stock updates, tracking sales orders, and managing reorders for seamless operational flow.
Sage API Integration Guide
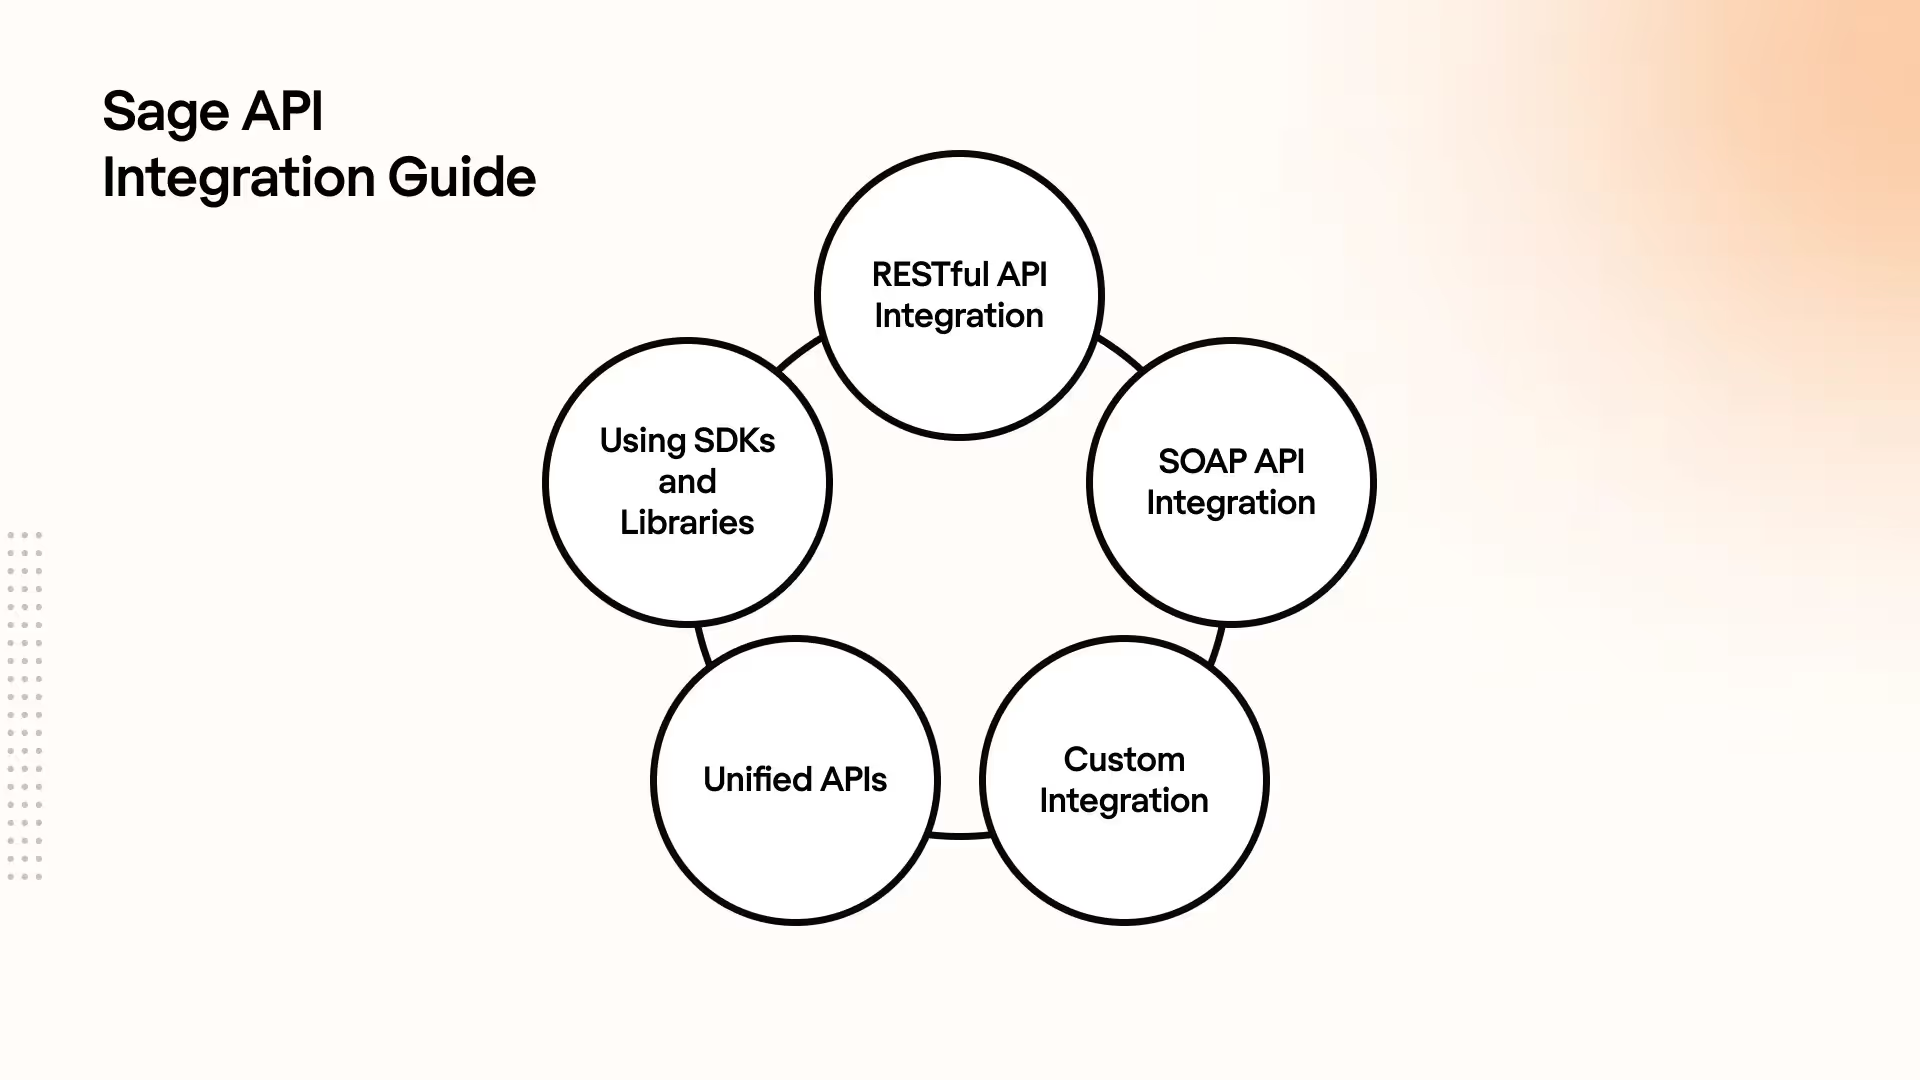
We’ll walk you through five different methods to integrate with Sage HR.

- RESTful API Integration: Set up authentication (e.g., Basic Auth or OAuth 2.0), test endpoints with Postman, and implement API calls using libraries like Axios.
- SOAP API Integration: Define the service URL and XML payload, and use SOAP libraries (e.g., Suds for Python) for communication.
- Custom Integration: Develop custom scripts or connectors for flexible, business-specific logic, allowing solutions at the cost of higher development time.
- Unified APIs: Leverage pre-built connectors to integrate with Sage HR to reduce complexity and launch faster.
- Using SDKs and Libraries: Download the relevant Sage SDK, follow setup instructions, and utilize pre-built functions for seamless API integration.
1. RESTful API Integration
Overview: RESTful APIs are popular for their simplicity and ease of use. By leveraging HTTP methods, developers can interact with Sage’s resources using familiar programming techniques.
Step 1: Obtain API Credentials
- Log in to Sage Developer Portal: Begin by logging into your Sage Developer Account.
- Generate API Key or OAuth 2.0 Credentials: Navigate to the API management section, where you can create an API key or set up OAuth 2.0 credentials. These are essential for secure access to the API.
- Save Credentials: Keep the API key, Client ID, and Client Secret in a secure location for later use.
Step 2: Authenticate API Requests
- Basic Auth: Include the API key in the request header if your integration supports Basic Authentication.
- OAuth 2.0: For OAuth, use your Client ID and Client Secret to request an access token.
Example: Requesting an OAuth 2.0 Access Token:
curl -X POST <https://HOSTNAME/sage/oauth2/token> \\
-H 'Content-Type: application/x-www-form-urlencoded' \\
-d 'grant_type=client_credentials&client_id=YOUR_CLIENT_ID&client_secret=YOUR_CLIENT_SECRET'
Step 3: Test API Endpoints with Postman or cURL
- Test your endpoints using Postman or cURL to verify that your authentication and requests are properly set up.
- Set the Authorization header with your access token and make your first GET request.
Example: Retrieve Customer Data
curl -X GET <https://api.sage.com/v1/customers> \\
-H 'Authorization: Bearer YOUR_ACCESS_TOKEN'
Step 4: Implement API Calls in Your Code
- Using libraries like Axios for JavaScript or requests for Python simplifies API requests in code. Include the necessary Authorization headers to ensure your calls are authenticated.
Example (JavaScript using Axios):
const axios = require('axios');

axios.get('<https://api.sage.com/v1/customers>', {
  headers: {
    'Authorization': `Bearer YOUR_ACCESS_TOKEN`
  }
})
.then(response => console.log(response.data))
.catch(error => console.error(error));
Step 5: Handle API Responses and Errors
- Always check for HTTP response codes to ensure your API calls are successful. Handle common errors like 400 Bad Request and 500 Internal Server Error by including robust error handling in your code.
- Pagination: For large datasets, implement pagination using
limitandoffsetparameters to avoid performance degradation when processing large amounts of data.
2. SOAP API Integration: Step-by-Step Breakdown
While SOAP APIs may be considered more complex, they provide structured and secure messaging, ideal for enterprise systems. SOAP requires a more detailed setup, but it can perform more complex operations when working with legacy systems like Sage X3.
Step 1: Obtain the WSDL File
- Navigate to your Sage product’s developer portal and download the WSDL file for the SOAP service you wish to integrate. This file defines the SOAP service and will guide your requests.
Step 2: Set Up the SOAP Client
- Use libraries such as Suds for Python or Savon for Ruby to interact with the SOAP API. These libraries simplify the process of sending SOAP requests and parsing XML responses.
Example (Python with Suds):
from suds.client import Client

client = Client('<https://api.sage.com/x3/soap?wsdl>')
Step 3: Define the SOAP Request
- Define the XML payload based on the WSDL. For example, if you’re retrieving employee data, you’ll need to send a well-formed XML request.
Step 4: Make the SOAP Request
- Use the client to send the SOAP request. The Suds client will automatically format the XML and send the request to the service.
Example (Retrieve Employee Data):
response = client.service.GetEmployee(employee_id=123)
print(response)
Step 5: Handle XML Responses and Errors
- Parse the XML response to extract the necessary data. Use built-in methods from the SOAP library to handle the XML structure and manage error codes or faults returned by the API.
- Error Handling: Implement robust error handling for SOAP-specific errors like invalid XML schemas, timeouts, and faults. Always validate your XML payload against the WSDL to prevent communication errors.
3. Custom Integration: Step-by-Step Breakdown
Overview: Custom integrations offer the most flexibility by allowing developers to build solutions for their organization’s unique needs. This method is ideal when the default integration tools don’t meet the specific requirements of a business process.
Step 1: Define Business Requirements
- Work with stakeholders to clearly define the custom workflows and data transformations that need to be implemented.
Step 2: Develop Custom Connectors
- Write custom scripts in Python, Java, or C# to interact with Sage’s APIs. Include necessary authentication, data retrieval, and data transformation logic within these connectors.
Example (Python Script for Data Pulling):
import requests

def get_customer_data():
    url = '<https://api.sage.com/v1/customers>'
    headers = {
        'Authorization': 'Bearer YOUR_ACCESS_TOKEN'
    }
    response = requests.get(url, headers=headers)
    if response.status_code == 200:
        return response.json()
    else:
        print(f"Error: {response.status_code}")

customer_data = get_customer_data()
print(customer_data)
Step 3: Apply Custom Business Logic
- Implement any business-specific rules or validation within the custom scripts. For example, if only active customers should be retrieved, apply filters before syncing the data.
Step 4: Test Custom Workflows
- Test the custom integration in a sandbox environment to ensure that it works correctly. Simulate real-world scenarios, including error conditions like network failures or API downtime.
Pro Tip:
Ensure that custom integrations are designed to be scalable. As the business grows, the integration should be able to handle increased volumes of data without performance degradation.
4. Using SDKs and Libraries
Overview:
Sage provides Software Development Kits (SDKs) for developers, which include pre-built methods for interacting with Sage products. These SDKs abstract much of the complexity, allowing developers to focus on application logic rather than low-level API interactions.
Step 1: Download and Install the SDK
- Visit the Sage Developer Portal and download the SDK for the specific Sage product you’re integrating (e.g., Sage X3, Sage CRM).
- Follow the SDK’s installation guide to set it up within your development environment. For JavaScript, you might use npm to install the SDK.
Example (Installing via npm):
npm install sage-sdkStep 2: Initialize the SDK
- Initialize the SDK in your application, passing in
your API key or OAuth token as needed.
Example (JavaScript Initialization):
const SageSDK = require('sage-sdk');
const client = new SageSDK({
  apiKey: 'YOUR_API_KEY'
});
Step 3: Use Pre-Built Functions for API Calls
- The SDK simplifies making API calls by providing pre-built functions for common tasks like retrieving customer data or submitting invoices.
Example (Retrieve Customer Data):
client.customers.getAll().then(customers => {
  console.log(customers);
}).catch(error => console.error(error));
Step 4: Error Handling with SDK
- While the SDK handles most error scenarios, ensure you have custom error handling in place for cases that require specific actions, such as retries or custom logging.
Pro Tip:
- Always keep the SDK up-to-date to take advantage of security patches and new features provided by Sage.
5: Integrating with Paycom Using Bindbee
Overview - Bindbee is a unified API platform that lets you integrate with Sage (and 50+ HRIS, ATS & Payroll Platforms) in just a few minutes. No-code, zero-maintenance integrations that offers round-the-clock data sync at one-tenth the cost of custom Integrations. Check out Bindbee today!
Setting up Sage Integration with Bindbee

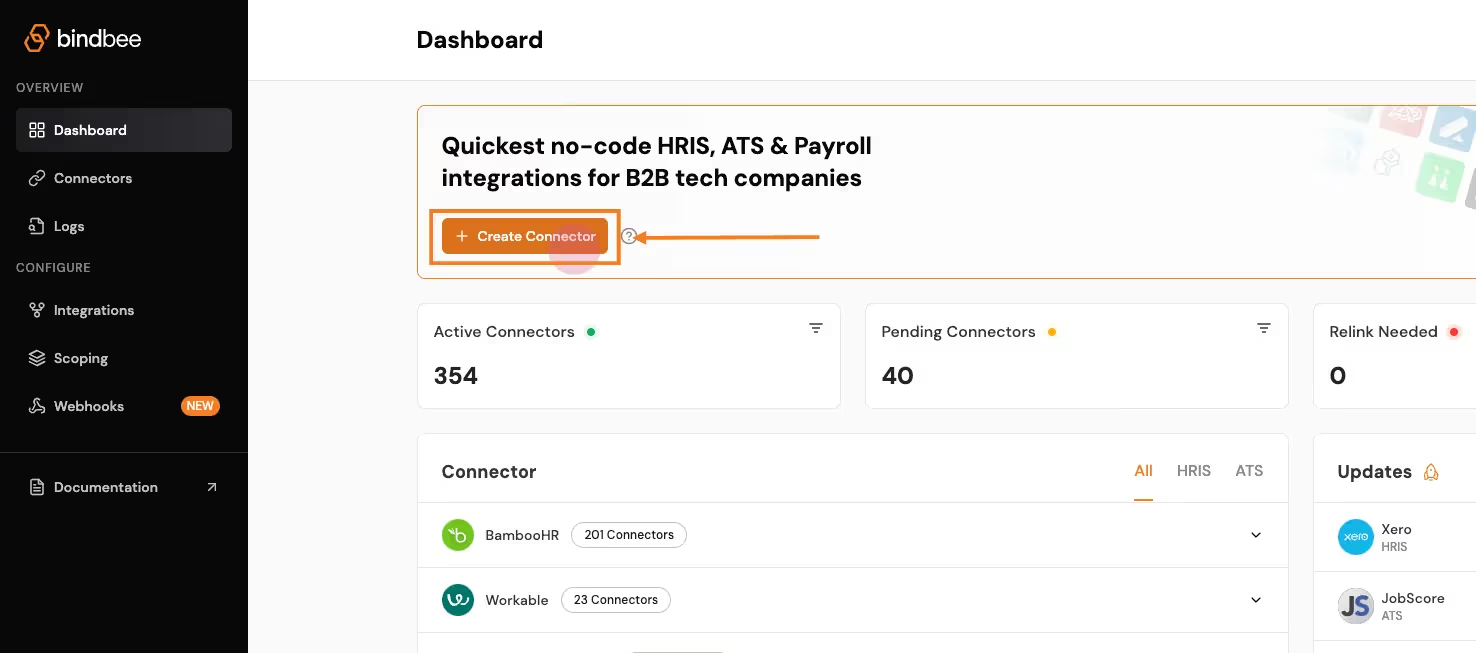
- Create a Connector:
- Click on Create Connector from the dashboard.
- Select HRIS as the type of integration. Enter customer details and give your connector a unique ID (e.g., Sage_Integration).
- Generate a Magic Link:
- After setting up the connector, click Create Link to generate a magic link. This will allow the customer to authenticate the connection with Sage.
- Open the link and enter the necessary credentials (e.g., Sage key, subdomain). This step establishes the connection between Sage and Bindbee.
- Sync the Connector:
- Once the connection is made, the connector will begin syncing data from Sage. This may take a few minutes depending on the size of the data. You can track the sync status in the connector section.
- Access the Synced Data:
- After syncing, go to the Employee section in the Bindbee dashboard and select Get Employees to retrieve employee data from Paycom.
- Get the API Key and Connector Token:
- Copy the API key and the x-connector-token from the Bindbee dashboard, which you will need to make authenticated API requests.
Retrieving Employee Data with Bindbee
Once the Sage data has been synced, you can retrieve employee data on to your application via the Bindbee API.
Here’s a step-by-step process for accessing synced data from Sage through Bindbee’s unified API:
- Request Setup:
- Use the Bindbee API to send a request for employee data. You’ll need both your Bindbee API token and the x-connector-token.
- Example Request:
- Using Python:
import requests

url = "https://api.bindbee.com/hris/v1/employees"
headers = {
    "Authorization": "Bearer YOUR_BINDBEE_API_KEY",
    "x-connector-token": "YOUR_CONNECTOR_TOKEN",
    "Accept": "application/json"
}
response = requests.get(url, headers=headers)
print(response.json())- Using cURL:
curl --request GET \
  --url https://api.bindbee.com/hris/v1/employees \
  --header 'Authorization: Bearer YOUR_BINDBEE_API_KEY' \
  --header 'x-connector-token: YOUR_CONNECTOR_TOKEN'
This request will return a list of employee objects, including details like the employee’s first name, last name, job title, department, and contact information.
Sample Response:
{
  "items": [
    {
      "id": "018b18ef-c487-703c-afd9-0ca478ccd9d6",
      "first_name": "John",
      "last_name": "Doe",
      "job_title": "Chief Technology Officer",
      "department": "Engineering",
      "work_email": "john@johndoe.dev"
    }
  ]
}
Bulk Employee Data Retrieval
For retrieving large datasets, Bindbee simplifies the process by allowing you to fetch bulk employee data from Sage.
The pagination feature helps manage large responses by returning results in pages.
What is Pagination?
“Pagination is the process of dividing a large dataset into smaller, manageable chunks or pages, allowing users to navigate through the data more easily without overwhelming them with too much information at once.”
- Pagination Parameters:
- Use the
cursorandpage_sizeparameters to navigate through the results. By default, Bindbee returns 50 records per page. - Example of a paginated request:
- Use the
url = "https://api.bindbee.com/hris/v1/employees?cursor=MDE4YjE4ZWYtYzk5Yy03YTg2LTk5NDYtN2I3YzlkNTQzM2U1&page_size=50"
response = requests.get(url, headers=headers)- Querying for Specific Employee Data:
- You can further refine your request by filtering based on specific fields, such as manager_id, remote_id, or company_id to get employees under a particular manager or company.
Check out the entire documentation here - Bindbee’s API documentation.
Get Started with Sage API Using Bindbee
Integrating with Sage HR shouldn’t be an engineering battle.
Yet, for most teams, it feels like a huge time sink—draining valuable engineering resources.

Let us handle the heavy lifting. You focus on growth. What say?
Book a demo with our experts today.


