What is Fatorial?
Factorial is a customizable HRIS (Human Resource Information System) that automates time, payroll, talent and finance processes in a centralized hub for small-midsize businesses.
In this guide, we’ll explore how to integrate Factorial HRIS into your applications, key features and look at common use cases of the Factorial API. Whether you’re a developer, HR-tech professional, or part of a tech team evaluating Factorial, this blog aims to help you leverage the API effectively.
Note - This is an educational article on Factorial API. If you’re looking for an easier way to launch integrations with factorial, check out Bindbee.
Our Unified API connects you to 50+ HRIS, ATS and Payroll Platforms in minutes. Zero maintenance, no-code Integrations that lets you launch at one-tenth the cost of custom Integrations.
That said, Here’s what we’ll cover in this article:
- A step-by-step factorial API integration guide using Direct API and with Bindbee.
- An overview of the API’s capabilities and key features.
- Best practices and troubleshooting tips for easier API operations.
Factorial API Integration Guide
We’ll walk you through two key methodologies to integrate with Factorial API.
Method 1 - Direct API Integration
What is Factorial API?
Factorial API is a RESTful API that facilitates data exchange and automation within the Factorial HRIS, particularly for employee details, time tracking, and payroll information.
Before you can access this data, you need to authenticate using OAuth 2.0, ensuring secure communication between your app and Factorial’s API.
Step 1: Set Up OAuth 2.0 Authentication
Factorial uses OAuth 2.0 for authentication, which allows your application to securely access the API on behalf of users. Follow these steps to configure the OAuth flow:
Step 1.1: Redirect Users to Authorization URL
To begin the authentication process, direct users to Factorial’s authorization URL where they will log in and approve access:
auth_url = '<https://api.factorialhr.com/oauth/authorize>'Ensure your app captures the authorization code that Factorial will send as a query parameter (code) to your redirect URL after users authorize access.
Step 1.2: Exchange Authorization Code for Access Token
Once the user authorizes, Factorial redirects them to your redirect_url with an authorization code in the URL. You will use this code to request an access token, which is required for API requests.
Here’s how to make the request using Python’s requests library:
import requests

client_id = 'your-client-id'
client_secret = 'your-client-secret'
redirect_url = 'your-redirect-url'
auth_code = 'auth-code-from-query-param'

payload = {
    'client_id': client_id,
    'client_secret': client_secret,
    'code': auth_code,
    'redirect_uri': redirect_url,
    'grant_type': 'authorization_code'
}

response = requests.post('<https://api.factorialhr.com/oauth/token>', data=payload)
token_response = response.json()
access_token = token_response['access_token']
refresh_token = token_response['refresh_token']
Step 1.3: Handle Token Expiration with Refresh Tokens
Access tokens are short-lived and will eventually expire. To keep your app connected, use the refresh_token provided in the previous response to request a new access token.
refresh_payload = {
    'client_id': client_id,
    'client_secret': client_secret,
    'refresh_token': refresh_token,
    'grant_type': 'refresh_token'
}

refresh_response = requests.post('<https://api.factorialhr.com/oauth/token>', data=refresh_payload)
new_token_response = refresh_response.json()
access_token = new_token_response['access_token']
Step 1.4: Secure API Credentials
Ensure you store sensitive information like this client_id,client_secret,and tokens securely.
Best practice involves storing these values in environment variables rather than hardcoding them in your script.
Step 2: Fetch Employee Data from Factorial
Now that you have the access token, you can make requests to the Factorial API to retrieve employee data.
Follow these steps to fetch the data.
Step 2.1: Set Authorization Header
Use the access token in the Authorization header to authenticate your API request. Set up the headers like this:
headers = {
    'Authorization': 'Bearer ' + access_token
}
Step 2.2: Send Request to /employees Endpoint
Send a GET request to Factorial’s /employees endpoint to fetch employee details:
employees_url = '<https://api.factorialhr.com/api/v1/employees>'

response = requests.get(employees_url, headers=headers)
employees_data = response.json()
print(employees_data)
This request will return employee data in JSON format, including fields such as id, full_name, email, and role.
Step 2.3: Parse the Employee Data
Once you receive the response, you can loop through the employee data to extract specific fields like their name, role, or contact details:
for employee in employees_data:
    full_name = employee['full_name']
    role = employee['role']
    email = employee['email']
    print(f"Employee: {full_name}, Role: {role}, Email: {email}")
Step 3: Handle Errors and Troubleshoot API Requests
To ensure your application can handle unexpected issues, it's important to implement error handling for common API errors such as unauthorized access or rate limiting.
Step 3.1: Handle Common Errors
- 401 Unauthorized: Occurs when the access token is missing or invalid. Ensure your token is correct or refresh it if expired.
- 403 Forbidden: Occurs when your credentials don’t have permission to access the requested resource. Ensure your API credentials are properly configured.
- 429 Too Many Requests: Occurs when you’ve exceeded the API’s rate limit. Retry the request after the time indicated in the
Retry-Afterheader.
Step 3.2: Implement Retry Mechanism for Rate Limiting
If you encounter a 429 error (rate limiting), wait for the time specified in the Retry-After header before attempting the request again. Here’s a basic retry mechanism:
import time

def fetch_employees():
    response = requests.get(employees_url, headers=headers)
    if response.status_code == 429:
        retry_after = int(response.headers.get('Retry-After', 60))
        print(f"Rate limited. Retrying after {retry_after} seconds...")
        time.sleep(retry_after)
        fetch_employees()  # Retry the request after waiting
    elif response.status_code == 401:
        print("Unauthorized. Check access token.")
    elif response.status_code == 403:
        print("Forbidden. Ensure permissions are correct.")
    else:
        return response.json()

employees_data = fetch_employees()
Step 4: Handle Pagination for Large Datasets
If your employee data is too large to be returned in a single response, Factorial will paginate the results. You’ll need to handle this pagination to ensure you retrieve all employee records.
Step 4.1: Check for Pagination in API Response
Factorial’s API returns a next URL in the response if there are additional pages of results. You can use this next URL to fetch subsequent pages of employee data.
next_url = employees_data.get('next')
while next_url:
    response = requests.get(next_url, headers=headers)
    next_data = response.json()
    employees_data.extend(next_data['results'])  # Add new data to existing list
    next_url = next_data.get('next')
This approach will ensure that you retrieve all employee records, even if the dataset spans multiple pages.
Easier Method: Integrating with Factorial Using Bindbee
Overview - Bindbee is a unified API platform that lets you integrate with Factorial (and 50+ HRIS, ATS & Payroll Platforms) in just a few minutes. No-code, zero-maintenance integrations that offer round-the-clock data sync at one-tenth the cost of custom Integrations. Check out Bindbee today!
Setting up Factorial Integration with Bindbee

- Create a Connector:
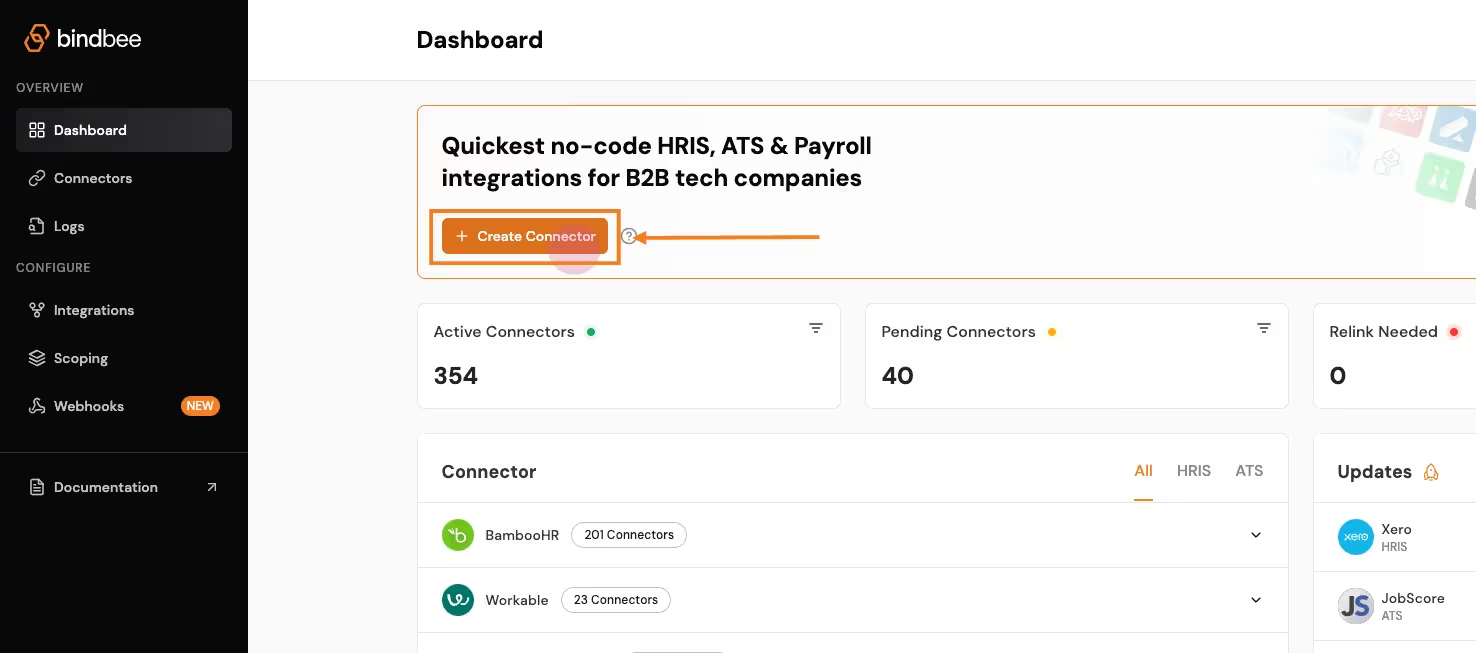
- Click on Create Connector from the dashboard.
- Select HRIS as the type of integration. Enter customer details and give your connector a unique ID (e.g., Factorial_Integration).
- Generate a Magic Link:
- After setting up the connector, click Create Link to generate a magic link. This will allow the customer to authenticate the connection with Bob API.
- Open the link and enter the necessary credentials (e.g., Bob key, subdomain). This step establishes the connection between the platform and Bindbee.
- Sync the Connector:
- Once the connection is made, the connector will begin syncing data from Bob. This may take a few minutes depending on the size of the data. You can track the sync status in the connector section.
- Access the Synced Data:
- After syncing, go to the Employee section in the Bindbee dashboard and select Get Employees to retrieve employee data from Bob.
- Get the API Key and Connector Token:
- Copy the API key and the x-connector-token from the Bindbee dashboard, which you will need to make authenticated API requests.
Retrieving Employee Data with Bindbee
Once the Factorial data has been synced, you can retrieve employee data on to your application via the Bindbee API.
Here’s a step-by-step process for accessing synced data from Factorial through Bindbee’s unified API:
- Request Setup:
- Use the Bindbee API to send a request for employee data. You’ll need both your Bindbee API token and the x-connector-token.
- Example Request:
- Using Python:
import requests

url = "https://api.bindbee.com/hris/v1/employees"
headers = {
    "Authorization": "Bearer YOUR_BINDBEE_API_KEY",
    "x-connector-token": "YOUR_CONNECTOR_TOKEN",
    "Accept": "application/json"
}
response = requests.get(url, headers=headers)
print(response.json())- Using cURL:
curl --request GET \
  --url https://api.bindbee.com/hris/v1/employees \
  --header 'Authorization: Bearer YOUR_BINDBEE_API_KEY' \
  --header 'x-connector-token: YOUR_CONNECTOR_TOKEN'
This request will return a list of employee objects, including details like the employee’s first name, last name, job title, department, and contact information.
Sample Response:
{
  "items": [
    {
      "id": "018b18ef-c487-703c-afd9-0ca478ccd9d6",
      "first_name": "John",
      "last_name": "Doe",
      "job_title": "Chief Technology Officer",
      "department": "Engineering",
      "work_email": "john@johndoe.dev"
    }
  ]
}
Bulk Employee Data Retrieval
For retrieving large datasets, Bindbee simplifies the process by allowing you to fetch bulk employee data from Factorial.
The pagination feature helps manage large responses by returning results in pages.
What is Pagination?
“Pagination is the process of dividing a large dataset into smaller, manageable chunks or pages, allowing users to navigate through the data more easily without overwhelming them with too much information at once.”
- Pagination Parameters:
- Use the
cursorandpage_sizeparameters to navigate through the results. By default, Bindbee returns 50 records per page. - Example of a paginated request:
- Use the
url = "https://api.bindbee.com/hris/v1/employees?cursor=MDE4YjE4ZWYtYzk5Yy03YTg2LTk5NDYtN2I3YzlkNTQzM2U1&page_size=50"
response = requests.get(url, headers=headers)- Querying for Specific Employee Data:
- You can further refine your request by filtering based on specific fields, such as manager_id, remote_id, or company_id to get employees under a particular manager or company.
Check out the entire documentation here - Bindbee’s API documentation.
Get Started with Factorial API Using Bindbee
Integrating with Factorial shouldn’t be an engineering battle.
Yet, for most teams, it feels like a huge time sink—draining valuable engineering resources.

Let us handle the heavy lifting. You focus on growth, what say?
Book a demo with our experts today.


